Addable
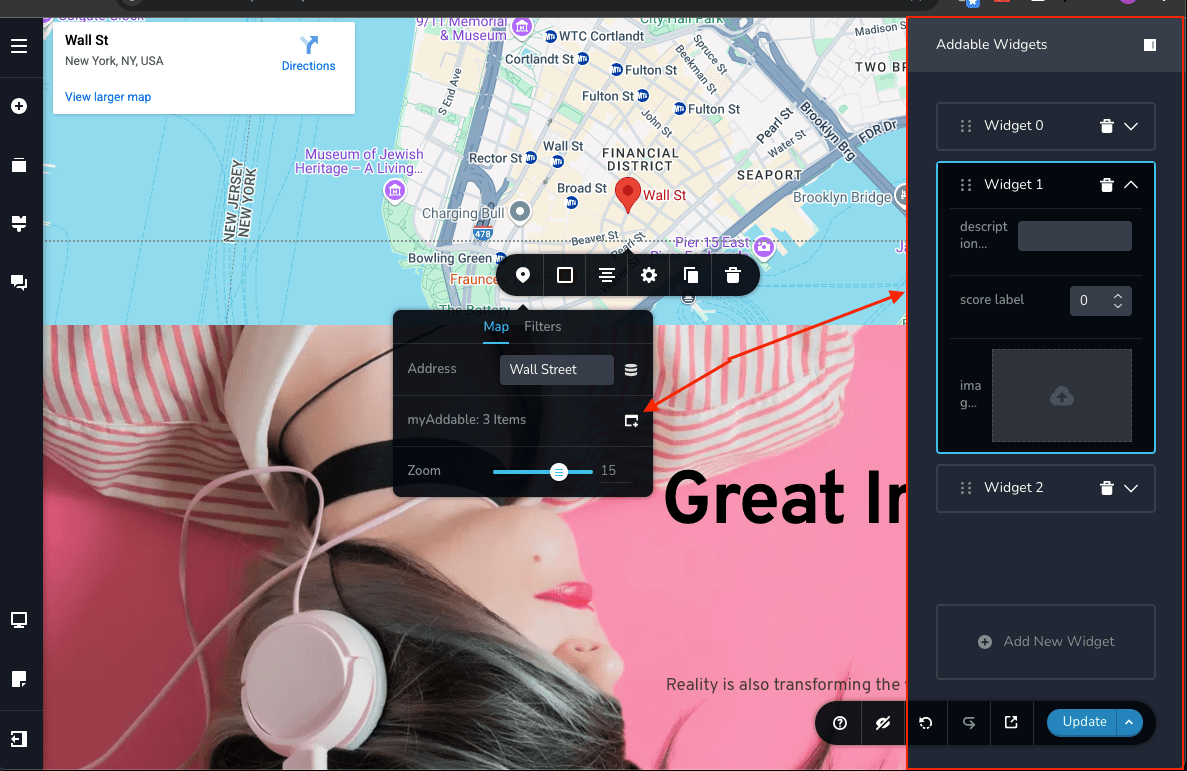
The addable Control is a highly configurable UI component designed for dynamic management of structured data. It
allows users to:
- Define a specific shape (structure) for items.
- Dynamically add new items based on the defined shape.
- Remove existing items.
- Reorder items as needed.
This control is particularly useful for creating dynamic lists or collections of items with consistent attributes, such as forms, tables, or task management interfaces.
Parameters
| Name | Type | Default | Description |
|---|---|---|---|
id | string | - | The identifier of the key where the addable save data |
type | string | - | The type should be "addable" to use this control |
shape | Array<ControlItem> | - | An Array of data controls ex: "inputText", "number", "textarea","backgroundColor" . . . |
default? | { value: Array<Group> } | - | The groups the control starts with, and optionally their defaults — see Default items Group: { id: string; title: string; defaults?: Record<string, unknown>; } |
roles? | Array<Role> | - | Render the control only if the current user's role matches one of the roles in the provided array type Role = "admin" | "viewer" | "editor" | "designer" | "manager" |
devices? | "all" | "desktop" | "responsive" | "all" | Define the devices where the control will be rendered. "all" renders the control on all devices. "desktop" renders the control only on desktop devices. "responsive" renders the control on both tablet and mobile devices |
disabled? | boolean | false | Configure the condition under which the control is disabled or enabled |
config?.title | string | option id | Setup title |
config?.icon | string | nc-iframe | Setup icon |
config?.showCount | boolean | false | Enable / Disable Message of the number of items |
config?.optionGroupTitle | string | "Widget" | Customize the title prefix for newly created groups. The title format will be {optionGroupTitle} {index} (e.g., "Widget 0", "Widget 1") |
config?.sidebarHeadTitle | string | "Addable Widgets" | Customize the title displayed in the sidebar header |
config?.addNewGroupTitle | string | "Add New Widget" | Customize the text displayed on the button that adds new groups |
config?.emptyMessage | string | "You do not have any option" | Customize the message displayed when there are no items in the addable control |
config?.className | string | - | Add custom CSS class name to the sidebar container |
config?.extraLabel | string | - | Display additional text label next to the icon button |
Example of control definition:
{
  id: "myAddable",
  type: "addable",
  config: {
    title: "MyAddableTitle",
    icon: "nc-hover-move",
    showCount: true,
    optionGroupTitle: "Item",
    sidebarHeadTitle: "My Items",
    addNewGroupTitle: "Add New Item",
    emptyMessage: "No items available",
    className: "custom-sidebar",
    extraLabel: "Manage"
  },
  shape: [
    {
      id: "description",
      label: "description label",
      type: "inputText",
    },
    {
      id: "score",
      label: "score label",
      type: "number",
    },
  ],
}
Return Value
The Addable returns an array of Groups, with the Following structure:
Array<{
  id: string;
  title: string;
}>;
Using the group IDs, we can collect data based on this predefined structure (shape), ensuring accurate identification and processing of each group.
The array of groups also represents the order in which they will be displayed in Sidebar.
Without a default the control starts empty, so this array starts as []. With
one, it starts with the declared groups — see Default items.
Example of returned value :
[
  {
    id: "zTLVWZ",
    title: "Widget 0",
  },
  {
    id: "ellf5q",
    title: "Widget 1",
  },
  {
    id: "rp7YOA",
    title: "Widget 2",
  },
  {
    id: "zmYmSn",
    title: "Widget 3",
  },
];
Key Generation
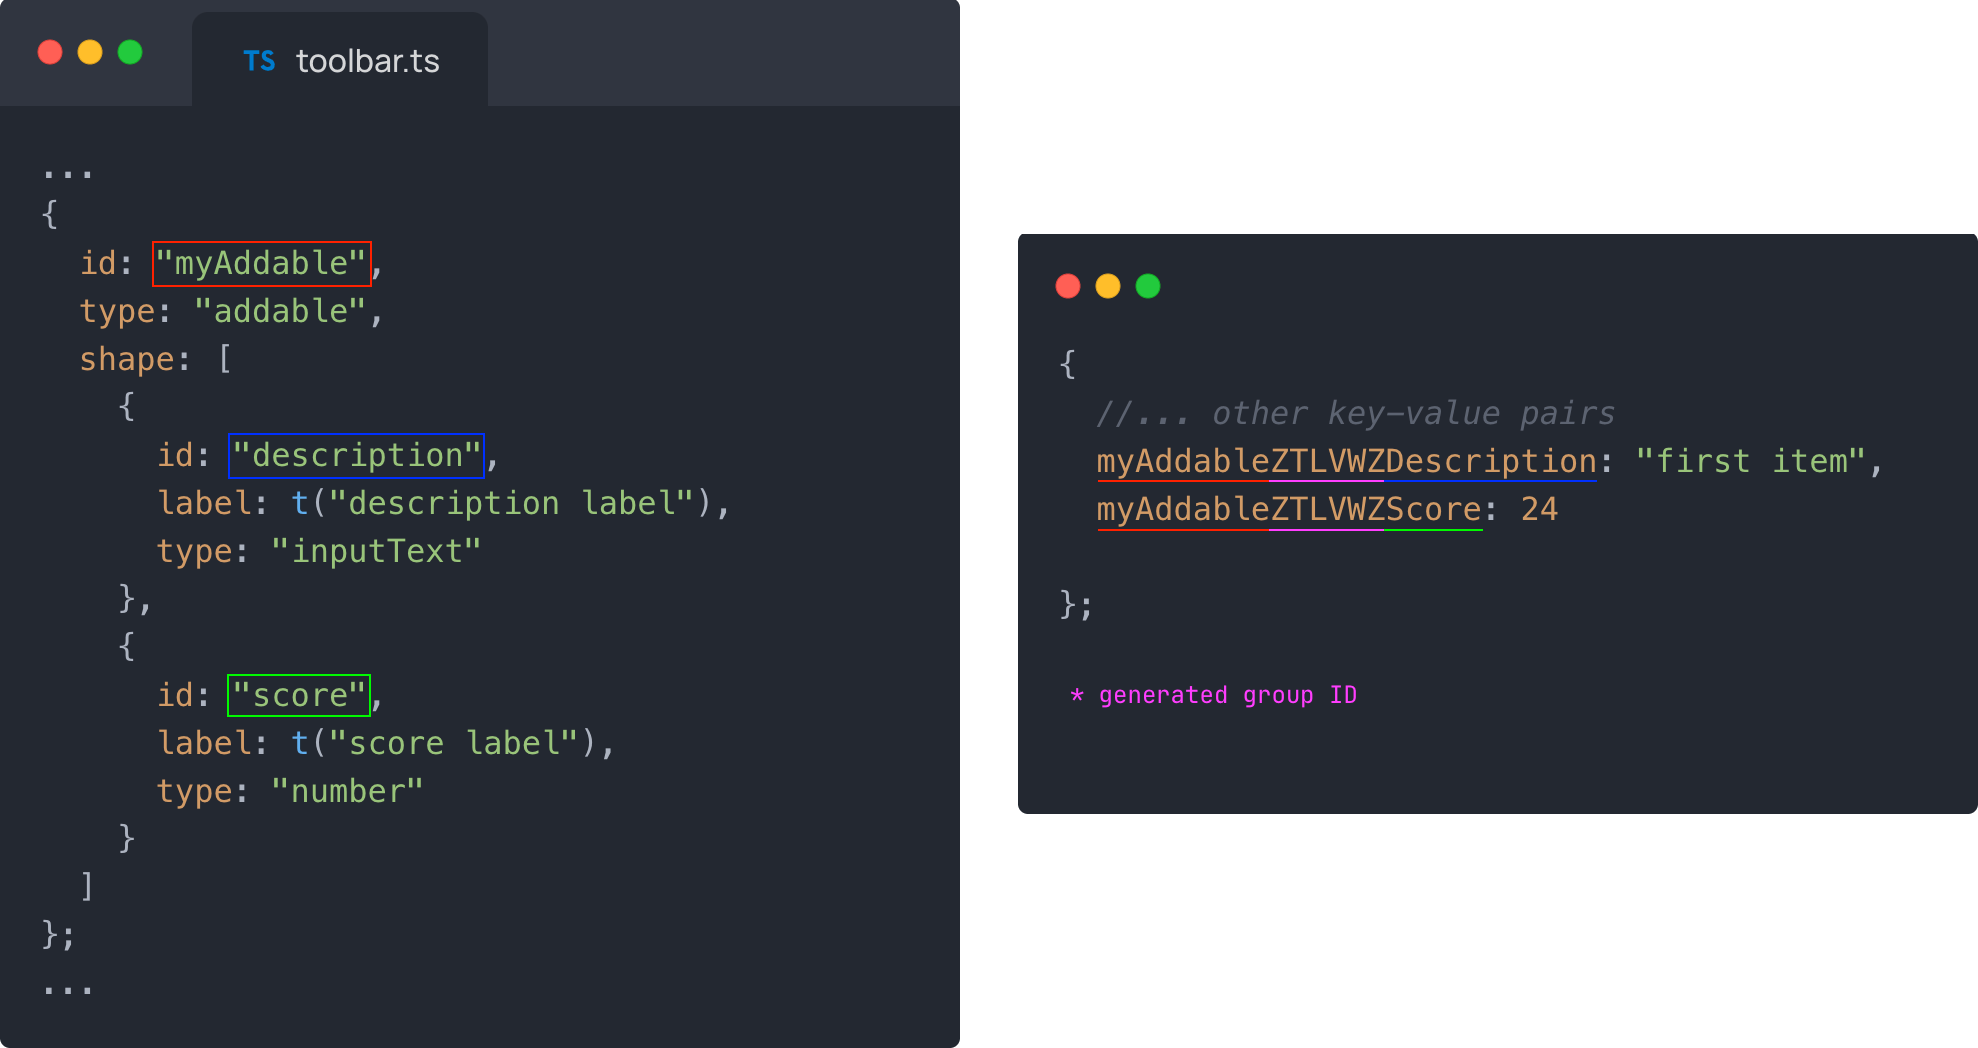
Each control within the group returns its respective value based on its type and configuration, as described in the " Return Value" section of each control's documentation. The keys for the returned values are generated using the id's of addable id, group id and the option id:
- AddableID: The id of the Addable Control (e.g., "myAddable").
- optionIDFromShape: The id of the individual control in the shape. For example: ("score", "description", ...).
- groupID: A unique identifier for each item added to the collection. For example ("zTLVWZ", "e32QiR", ...).
Example of resulted key
// addableID = "myAddable"
// groupID = "zTLVWZ" //(for example the id of firstGroup)
// optionIDFromShape = "description"

camelCase([addableId, groupId, controlID]); // myAddableZTLVWZDescription
Read the values by iterating the returned array of groups.
Usage
Default items
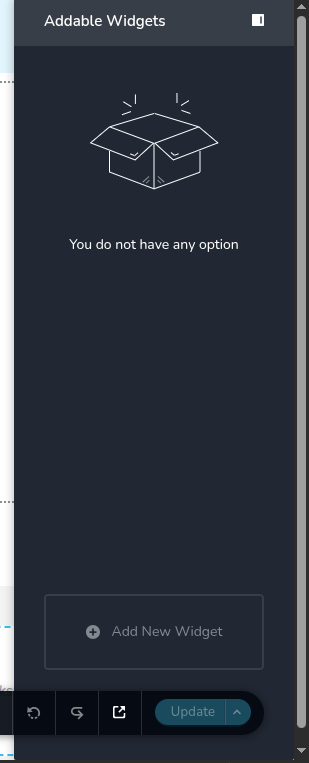
Without a default, the control starts empty and the user has to add every item
by hand:
default can be declared on two levels, and they do different things: on a
shape control it sets what a group holds, on the addable it sets which
groups exist. Only the second one creates items.
Where a value comes from
The value of a shape control inside a group is resolved in this order, first hit wins:
defaults[<control id>]of that groupdefaultof the shape control- the value the control falls back to on its own
Level 3 is the one that surprises people: a shape control with no default
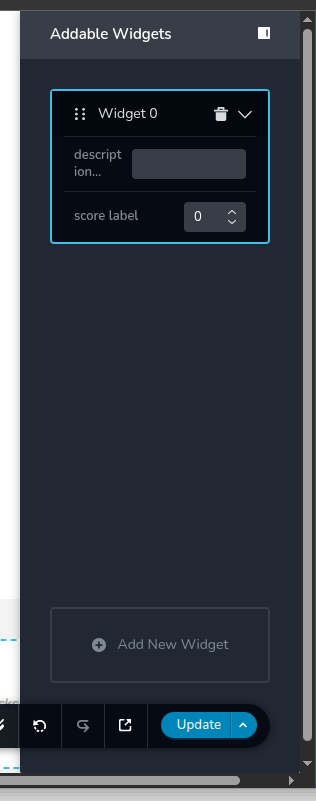
still writes a key. Adding an item to the control above — where nothing is
declared anywhere — gives an empty inputText and a 0 number:
There is no "no value" state. An inputText falls back to "", a
colorPicker to black at opacity 1, a corners to its whole model (~20 keys).
default on a shape control
Sets the value of that control in every group — the declared ones and every one the user adds later. It does not create any item: the control still starts empty, but "Add New" now produces a filled item.
{
  id: "myAddable",
  type: "addable",
  shape: [
    {
      id: "description",
      label: "description label",
      type: "inputText",
      default: { value: "No description" }
    },
    {
      id: "score",
      label: "score label",
      type: "number",
      default: { value: 77 }
    }
  ]
}
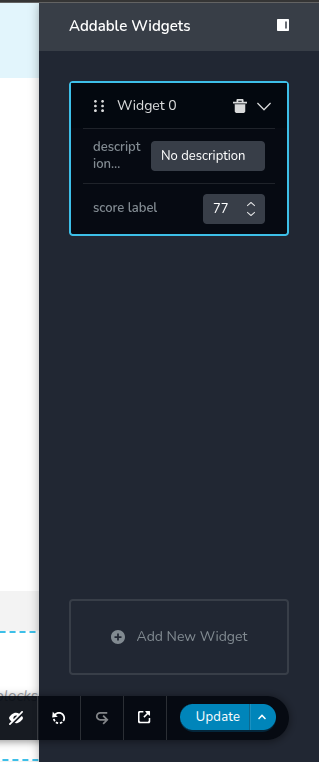
default on the addable
Sets which groups the element starts with, so the element comes with its items already filled in, both in the editor and on the published page.
{
  id: "myAddable",
  type: "addable",
  default: {
    value: [
      { id: "first", title: "Item 1", defaults: { score: { value: 10 } } },
      { id: "second", title: "Item 2" }
    ]
  },
  shape: [
    {
      id: "description",
      label: "description label",
      type: "inputText",
      default: { value: "No description" }
    },
    {
      id: "score",
      label: "score label",
      type: "number",
      default: { value: 77 }
    }
  ]
}
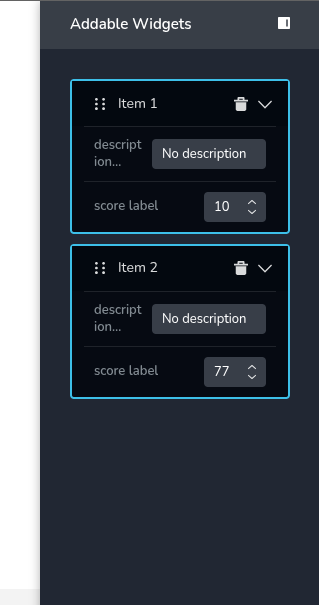
All three levels are visible above: Item 1 takes its score from its own
defaults, Item 2 from the shape default, and both take their description from
the shape default. The generated keys hold:
{
  myAddable: [
    { id: "first", title: "Item 1" },
    { id: "second", title: "Item 2" }
  ],
  myAddableFirstScore: 10,                      // from `defaults`
  myAddableFirstDescription: "No description",  // from the shape default
  myAddableSecondScore: 77,                     // no `defaults`, so the shape default
  myAddableSecondDescription: "No description"
}
defaults
defaults is keyed by shape control id. Each entry is an object with the same
keys as that control's own default, which every control page documents under
its "Default value example":
default: {
  value: [
    {
      id: "first",
      title: "Item 1",
      defaults: {
        score: { value: 10 },                   // number
        description: { value: "Hand written" }, // inputText
        color: { hex: "#DD4B39", opacity: 1 },  // colorPicker
        background: {                           // backgroundColor
          bgColorType: "solid",
          bgColorHex: "#DD4B39",
          bgColorOpacity: 1
        }
      }
    }
  ]
}
Declare only the keys you want to set — the control fills in the rest from its
own defaults. The background above also produces
myAddableFirstBackgroundGradientColorHex,
myAddableFirstBackgroundGradientType and the other
backgroundColor keys without being asked.
Use the names from the control's "Default value example", not from its "Return
value" section. They are not the same list. backgroundColor hands your
component hex, opacity and type, but is declared with bgColorHex,
bgColorOpacity and bgColorType. Declaring the returned names is not an
error — it is silently ignored and you get the control's defaults instead:
bgColorType: "none", bgColorHex: "#000000", bgColorOpacity: 0, an
invisible background.
A control's fallback is not always neutral. backgroundColor defaults its
opacity to 0, so a "solid" background declared without bgColorOpacity: 1
comes out fully transparent.
Arrays work as well, so an animated gradient can declare its stops:
defaults: {
  background: {
    bgColorType: "animated-gradient",
    gradientType: "linear",
    gradientLinearDegree: 45,
    gradientStops: [
      { position: 0, hex: "#FF0000", opacity: 1 },
      { position: 100, hex: "#0000FF", opacity: 1 }
    ]
  }
}
defaults is optional per group and per control. Anything it does not define
falls back to level 2, then to level 3.
Rules
- The group
idis what the keys are built from. It must start with a letter and contain only letters and digits. Keep it stable — changing it in the declaration orphans the values the user already saved under the old one.titleis free to change, the user renames it. defaultsitself is never stored; the groups are saved as{ id, title }.- A group added by the user gets the shape
defaults too, but never thedefaultsof a declared group, since those belong to one specificid.
Roles example
Show the control only to users with admin and designer privileges.
{
  id: "myAddable",
  type: "addable",
  roles: ["admin", "designer"],
  shape: [
    {
      id: "description",
      label: "description label",
      type: "inputText"
    }
    // ...
  ]
}
Config title example
Displays the title set to the left of control
{
  id: "myAddable",
  type: "addable",
  config: {
    title: "MyAddableTitle",
  },
  shape: [
    {
      id: "description",
      label: "description label",
      type: "inputText"
    }
    // ...
  ]
}
Config icon example
Set-up a "menu" icon for the open button
{
  id: "myAddable",
  type: "addable",
  config: {
    icon: "nc-menu-3",
  },
  shape: [
    {
      id: "description",
      label: "description label",
      type: "inputText"
    },
    // ...
  ]
}
Config showCount example
Show number of groups
{
  id: "myAddable",
  type: "addable",
  config: {
    showCount: true
  },
  shape: [
    {
      id: "description",
      label: "description label",
      type: "inputText"
    },
    // ...
  ]
}
Config optionGroupTitle example
Customize the title prefix for newly created groups
{
  id: "myAddable",
  type: "addable",
  config: {
    optionGroupTitle: "Item"
  },
  shape: [
    {
      id: "description",
      label: "description label",
      type: "inputText"
    },
    // ...
  ]
}
Config sidebarHeadTitle example
Customize the title displayed in the sidebar header
{
  id: "myAddable",
  type: "addable",
  config: {
    sidebarHeadTitle: "My Custom Items"
  },
  shape: [
    {
      id: "description",
      label: "description label",
      type: "inputText"
    },
    // ...
  ]
}
Config addNewGroupTitle example
Customize the text displayed on the button that adds new groups
{
  id: "myAddable",
  type: "addable",
  config: {
    addNewGroupTitle: "Add New Item"
  },
  shape: [
    {
      id: "description",
      label: "description label",
      type: "inputText"
    },
    // ...
  ]
}
Config emptyMessage example
Customize the message displayed when there are no items
{
  id: "myAddable",
  type: "addable",
  config: {
    emptyMessage: "No items available. Click to add one."
  },
  shape: [
    {
      id: "description",
      label: "description label",
      type: "inputText"
    },
    // ...
  ]
}
Config className example
Add custom CSS class name to the sidebar container
{
  id: "myAddable",
  type: "addable",
  config: {
    className: "my-custom-sidebar"
  },
  shape: [
    {
      id: "description",
      label: "description label",
      type: "inputText"
    },
    // ...
  ]
}
Config extraLabel example
Display additional text label next to the icon button
{
  id: "myAddable",
  type: "addable",
  config: {
    extraLabel: "Manage"
  },
  shape: [
    {
      id: "description",
      label: "description label",
      type: "inputText"
    },
    // ...
  ]
}
Disabled examples
Control will be disabled. Normally, here should be your dynamic condition.
{
  id: "myAddable",
  type: "addable",
  disabled: true
  shape: [
    {
      id: "description",
      label: "description label",
      type: "inputText"
    },
    // ...
  ]
}
Devices example
It will be rendered on all devices. This value can be skipped because it is set to "all" by default.
{
  id: "myAddable",
  type: "addable",
  devices: "all"
  shape: [
    {
      id: "description",
      label: "description label",
      type: "inputText"
    },
    // ...
  ]
}
Rendering will occur only on desktop.
{
  id: "myAddable",
  type: "addable",
  devices: "desktop"
  shape: [
    {
      id: "description",
      label: "description label",
      type: "inputText"
    },
    // ...
  ]
}
The display is limited to responsive modes, specifically tablet and mobile.
{
  id: "myAddable",
  type: "addable",
  devices: "responsive"
  shape: [
    {
      id: "description",
      label: "description label",
      type: "inputText"
    },
    // ...
  ]
}
Usage in HTML example
import React from "react";
import { Brizy } from "@brizy/core";

// Utility function to convert array of strings to camelCase
const camelCase = (strings) => {
  const capitalize = (str) => str.charAt(0).toUpperCase() + str.slice(1);
  return strings.reduce((acc, str) => {
    return acc === "" ? str : acc + capitalize(str);
  }, "");
};

function List(props) {
  const { myAddable } = props;
  // myAddable = [
  //   { id: "zTLVWZ", title: "Widget 0" },
  //   { id: "ellf5q", title: "Widget 1" }
  // ]

  const values = myAddable?.map(({ id: groupId }) => {
    const descriptionKey = camelCase(["myAddable", groupId, "description"]);
    // descriptionKey = "myAddableZTLVWZDescription"

    const scoreKey = camelCase(["myAddable", groupId, "score"]);
    // scoreKey = "myAddableZTLVWZScore"

    return {
      description: props[descriptionKey],
      score: props[scoreKey],
    };
  });

  return (
    <ul className="score-list">
      {values.map((item) => (
        <li>
          desc: {item.description} score:{item.score}
        </li>
      ))}
    </ul>
  );
}

Brizy.registerComponent({
  id: "Thirdparty.List",
  component: { editor: List, view: List },
  title: "Items list",
  category: "custom",
  options: (props) => {
    return [
      {
        selector: ".score-list",
        toolbar: [
          {
            id: "toolbarCurrentElement",
            type: "popover",
            config: {
              icon: "nc-text",
              title: "Text",
            },
            devices: "desktop",
            options: [
              {
                id: "myAddable",
                type: "addable",
                shape: [
                  {
                    id: "description",
                    label: "description label",
                    type: "inputText",
                  },
                  {
                    id: "score",
                    label: "score label",
                    type: "number",
                  },
                ],
              },
            ],
          },
        ],
      },
    ];
  },
});